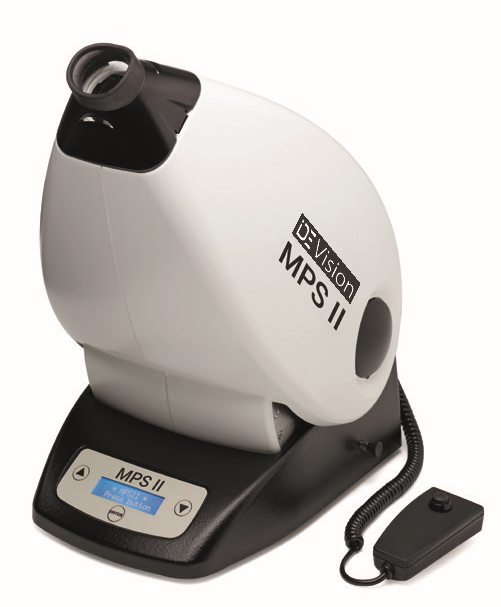
Macular Pigment Screener (MPS II)
Support material
How can we help you?
On these pages you will find user manuals, software downloads and frequently asked questions relating to the MPS II.
If you cannot find what you are looking for, please contact us.
The previous version of this device was called the MPOD in Europe and branded as the QuantifEyeTM in the USA.
Software
Current version: 6.0.1
Software release notes
New features
High MP values – this release includes an update to deliver a better user experience for patients with very high MPOD scores. When the patient’s MPOD value was high AND no point of isoluminance could be determined before the test ended, the device previously delivered a Reject message. In Version 5.2, if the patient has not reached isoluminance by the end of the test, the software will now deliver a Test Successful message and provide the MPOD value as > 0.9, providing the data is not noisy and conforms to the Confidence Level algorithm.
Importing databases from v2.03H – some customers have been experiencing difficulty importing old patient databases that predate the Confidence Level feature enhancements that were available in Version 4 onward.
Please note that patients’ existing records will not have confidence values calculated if this was not in the original test record.
Databases created using the MPS II v4.xx application are imported into the new Version 5 format when the application is run for the first time after installation. Databases created using the MPS II v2.03H application are imported into the new Version 5 format when the application is run for the first time after installation.
Additionally, in this release the importing of legacy databases – usually version 2.03H and earlier – is now included in the installer routine. This removes the previous need to install in two steps.
Bug fixes
Minor modification to data smoothing algorithm and display.
Supported platforms
Windows 7 Professional, and above.
Software dependencies
Adobe Reader XI must be installed for viewing reports.
Software downloads
Download the MPS II Version 6.0.1 installer here.
Download the Adobe installer here.
Frequently Asked Questions
Test results
Quick Start Guide
Sometimes a patients’ responses will generate a test that is rejected by the MPS II software. There are a number of reasons for this and a few possible scenarios are explained below.
Scenario 1
As you can see from the rejected right eye below, the patient’s curve never went down before going up. This is because they have less than 0.05 MP in that eyeand the first point tested was their minimum. This is backed up by the left eye recording a similarly low result.

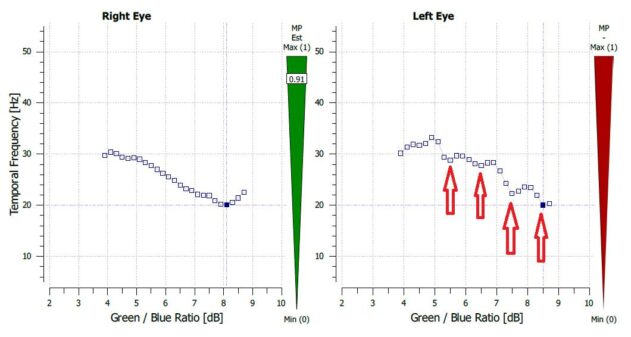
Scenario 2
The right eye below is a good example of a curve. The left eye however is what we refer to as ‘noisy’ data. It can be seen that there are four points where the curve dips and then rises again. The correct minimum is identified by the software (as it correlates well with the result for the right eye) but there is less confidence in the data hence the reject result.
Scenario 3
The graph for the right eye looks more like a ‘W’ than a classic curve. This could be due to the patient not paying attention throughout the test or changing their criteria for responses during the test. It is important to stress to the patient that they only press the button when they first see the stimulus start to flicker. If patients decides to change the manner in which they respond mid-test then this will have a significant impact on the accuracy of the result.
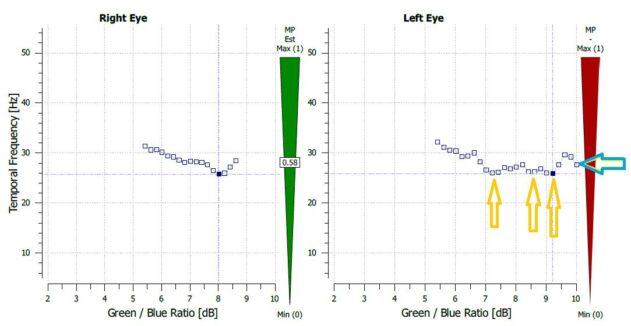
Scenario 4
This reject result for the left eye is due to noisy data and also possibly patient fatigue. There are a number of possible minimum points similar to the one recorded for the right eye, but towards the end of the test, the patient appears to have lost concentration and has run out of test points.
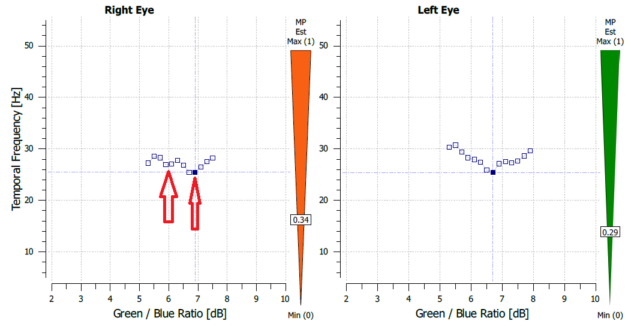
Why do some results show as ‘Caution’
A caution result is one where the software has determined an MPOD score but is uncertain about the quality of the data. It may be slightly noisy, so it advises the result but with a caution. In the example below, you can see there is a Caution result for the right eye as there is not a clean, downward sloping graph as expected. However, when the result is compared with the result for the left eye it appears valid as the low points are very similar so, in this case, it can be accepted.
If there is time, then we always advise re-testing a Caution result, to be absolutely certain of accuracy.
Technical
How often does the MPS II need to be calibrated?
The MPS II is not self-calibrating. It requires an external calibrated luminance meter to check / adjust calibration. We recommend that this is done every two years. The LEDs in the unit are very stable and do not degrade with time or normal use but a check is always advised.
What are the minimum PC requirements for the MPS II control device?
The Laptop or PC must have a Windows 7™ operating system, or above, whilst the hardware spec should meet or exceed the following:
- 1 gigahertz (GHz) or faster 32-bit (x86) or 64-bit (x64) processor
- 1 gigabyte (GB) RAM (32-bit) or 2 GB RAM (64-bit)
- 2 GB available hard disk space (32-bit) or 3 GB (64-bit)
The PC must also have at least one unused USB port.
What is the software reporting ‘USB device not found’ when my MPS II is connected to my PC?
To resolve this issue, follow these steps:
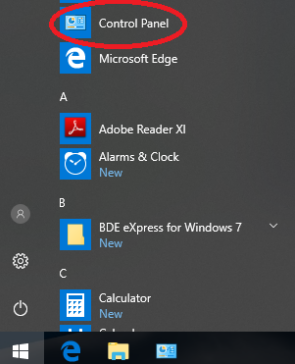
1) Open your Windows Start Menu at the bottom left of your PC
2) Select ‘Control Panel’, as shown below
3) Double-click on ‘Device Manager’

4) Scroll to the bottom of the list and locate the last item, ‘Universal Serial Bus controllers’, by clicking on the ‘>’ to its left
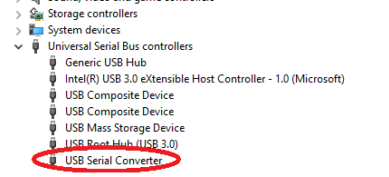
5) Scroll to the bottom of the list and locate the last item, ‘Universal Serial Bus controllers’, by clicking on the ‘>’ to its left
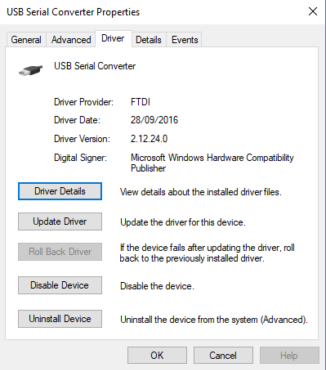
Check that the ‘Driver Provider’ is ‘FTDI’.
N.B. The ‘Driver Version’ will differ from the screenshot above…
Then, if the ‘Roll Back Driver’ button is active then press it.
A computer restart may be required.
After the restart, check that the MPS II software application can see the device hardware by opening the software from the desktop shortcut and checking the device is listed as ‘Ready’ at the bottom of the Main Menu screen.
Service
Please contact your local agent for parts and accessories.
Find your local agent’s contact details quickly via our Distributors page
Parts and accessories
Please contact your local agent for service details.
Find your local agent’s contact details quickly via our Distributors page